Understanding the AndroidAPS screens
You can switch between screens by swiping left or right. The “hamburger” icon at the top left takes you to a menu of modules that you have hidden un the Config Builder and the three dots at the right takes you to a further menue of settings and other options.
The Overview screen
This is the first screen you will come across when you open AndroidAPS and it contains most of the information that you will need day to day.
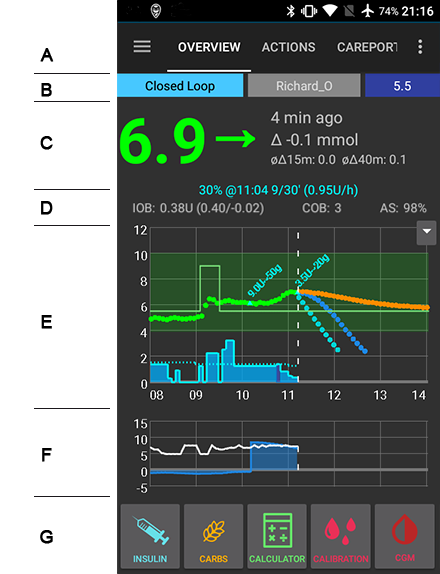
Section A: allows you to navigate between the various AndroidAPS modules by swiping left or right. The “Hamburger” menu on the left allows you to access any modules that have been hidden from the main navigation and the three dots on the right give you access to the preferences and settings.
Section B: Allows you to change the loop status (open loop, closed loop, suspend loop etc), see your current profile, to see your current target blood glucose level and to set a temporary target. Long press on any of the buttons to alter the setting.
Section C: The latest blood glucose reading from your CGM, how long ago it was read, changes in the last 15 and 40 minutes,
Section D: shows your current basal rate - including any temporary basal rate (TBR) programmed by the system, your insulin on board (IOB) and carbs on board (COB).
The insulin on board figure would be zero if just your normal pre-programmed basal was running and there was no insulin remaining from previous boluses. The figures in brackets show how much consists of insulin remaining from previous boluses and how much is a basal variation due to previous TBRs programmed by AndroidAPS. This second component may be negative if there have recently been periods of reduced basal.
If you have a label AS as well as the IOB and COB this refers to the current AutoSense sensitivity.
Section E: Is the graph showing your blood glucose (BG) as read from your glucose monitor (CGM) it also shows Nightscout notifications such as fingerstick calibrations, and carbs entries.
The small pulldown arrow on the right is where you can select which information is displayed on the charts below. Press on the down arrow to see your options.
The predictions lines if you have them selected are:
- ORANGE (COB) predicts where your BG will go based on the current pump settings and assuming that the deviations due carb absorption remain constant. This line only appears if there are known COB.
- The DARK YELLOW (UAM) line (if present) is (UnAnnounced Meal). It is similar to the ORANGE COB line but it assumes that the deviations will taper down at a constant rate (by extending the current rate of reduction).
- The DARK BLUE line (IOB) shows what would happen under the influence of insulin only. For example if you dialled in some insulin and then didn’t eat any carbs.
- LIGHT BLUE line (Zero Temp) shows how the IOB trajectory line would change if the pump stopped all insulin delivery (0% TBR).
In this context a DEVIATION is the difference in BG caused the upward pressure of carb absorption relative to insulin alone. Deviations are used as a proxy for carb absorbtion and are discussed in greater detail elsewhere in this documentation.
The thin GREEN line is your BG target, in this illustration you can also see a temporary target lasting for around 25 minutes.
The blue line shows the basal delivery of your pump. The dotted blue line is what the basal rate would be if there were no temporary basal adjustments (TBRs) and the solid blue line is the actual delivery over time. Long press on the graph to change the time scale. You can choose 6, 8, 12, 18 or 24 hours.
Section F: is also configurable using the options in section D. In this example we are showing the IoB (Insulin on Board) - if there were no TBRs and no remaining boluses this would be zero, the sensitivity, and the deviation. GREY bars show a deviation due to carbs, GREEN that BG is higher than the algorithm expected it to be and RED that it is lower than the algorithm expected.
Section G: enables you to administer a bolus (normally you would use the Calculator button to do this) and to add a fingerstick CGM calibration. The buttons in this section are configurable using the settings for the Overview screen and you can choose to display those which are most useful to you.
The Calculator
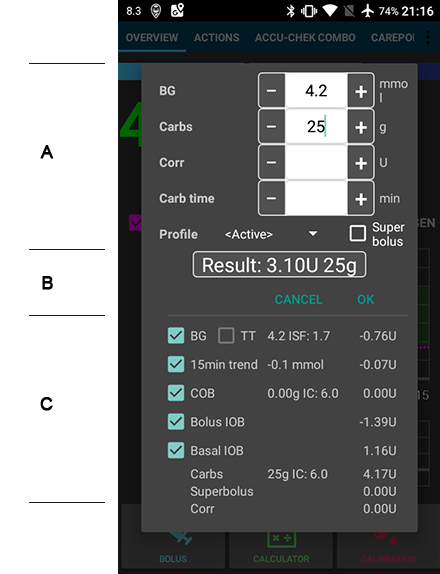
When you want to make a meal bolus this is where you will normally make it from.
Section A: contains is where you input the information about the bolus that you want. The BG field is normally already populated with the latest reading from your CGM. If you don’t have a working CGM then it will be blank. In the CARBS field you add your estimate of the amount of carbs - or equivalent - that you want to bolus for. The CORR field is if you want to modify the end dosage for some reason, and the CARB TIME field is for pre-bolusing so you can tell the system that there will be a delay before the carbs are to be expected and the bolus will be delayed. You can put a negative number in this field if you are bolusing for past carbs.
SUPER BOLUS is where the basal insulin for the next two hours is added to the immediate bolus and a zero TBR is issued for the following two hours to take back the extra insulin. The idea is to deliver the insulin sooner and hopefully reduce spikes.
Section B: shows the calculated bolus. If the amount of insulin on board already exceeds the calculated bolus then it will just display the amount of carbs still required.
Section C: shows the various elements that have been used to calculate the bolus. You can deselect any that you do not want to include but you normally wouldn’t want to. TT stands for Temporary Target, ISF is Insulin Sensitivity Factor, COB is Carbs on Board, IOB is Insulin on Board.
Carbs
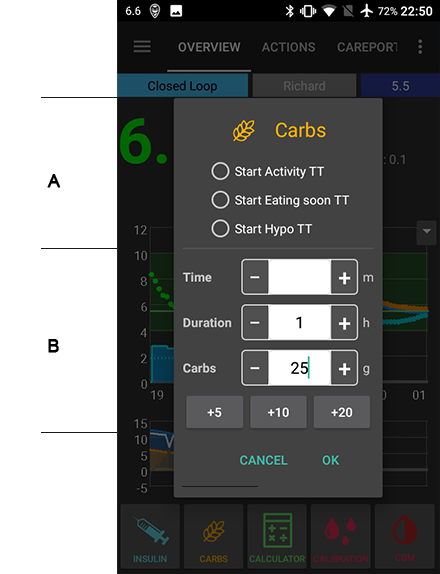
If you need to tell AndroidAPS about some extra carbs (or equivalent) you can do this here, without necessarily bolusing. A nice thing about this feature is that it allows you to tell the app about long lasting carbs that you might normally need an extended bolus for. These appear in your timeline in orange while they are still in the future and then change to the normal colour as time moves on.
In section A you enter any temporary target (TT) you think is appropriate, then in section B you can tell it (TIME) about how long you want the start of the carb action to be delayed (this can be a negative if you want the start to be in the past ) the DURATION you expect the carbs to last in hours, and finally the amount of carbs (or equivalent) in grams.
This tells the AndroidAPS algorithm that it needs to use the calculation for carbs on board rather than the one for controlling basal levels in the absence of carbs. If you have SMB (Super Micro Bolus) enabled then they will be issued if the algorithm calculates that they are necessary.
The “HYPO” temporary target is designed to prevent the rig from giving extra insulin in response to your rescue carbs. It will be preset automatically if your BG at the time is less than 4.0 mmol/L. Or you can simply select the HYPO TT before inputting the amount of your rescue carbs.
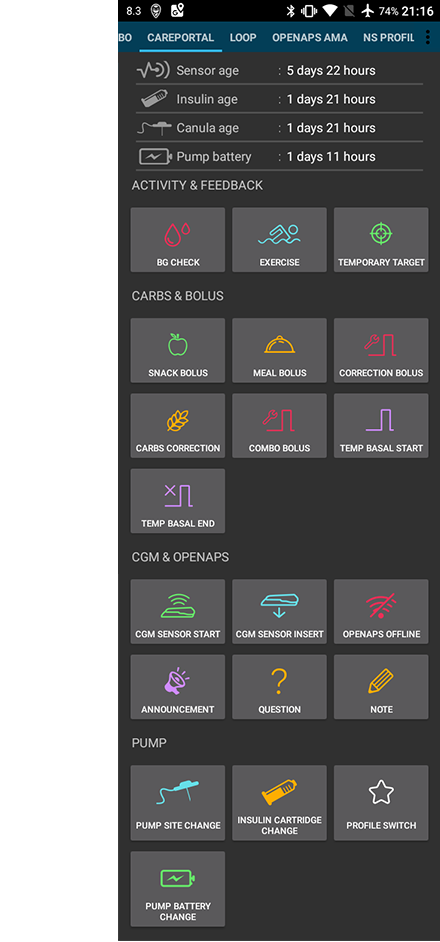
Actions

This screen shows a number of commonly used actions. Most are self explanatory. TDD is Total Daily Dose and it takes you to an analysis of your insulin usage over the last few days. The HISTORY BROWSER enables you to scroll back over your history and examine your BG records, basals, and so on.
Insulin Profile
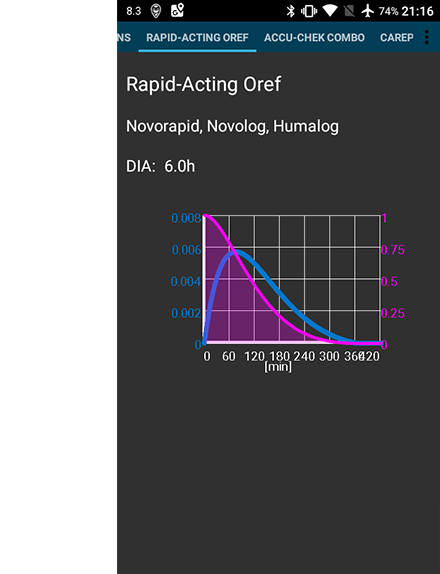
This shows the activity profile of the insulin you have chosen. The PURPLE line shows how much insulin remains after it has been injected as it decays with time and the BLUE line shows how active it is.
You will normally be using one of the Oref profiles - and the important thing to note is that the decay has a long tail. If you have been used to manual pumping you have probably been used to assuming that insulin decays over about 3.5 hours. However, when you are looping the long tail matters as the calculations are far more precise and these small amounts add up when they are subjected to the recursive calculations in the AndroidAPS algorithm.
For a more detailed discussion of the different types of insulin, their activity profiles and why all this matters you can read an article here on Understanding the New IOB Curves Based on Exponential Activity Curves
And you can read an excellent blog article about it here: Why we are regularly wrong in the duration of insulin action (DIA) times we use, and why it matters…
And more at: Exponential Insulin Curves + Fiasp
Pump Status
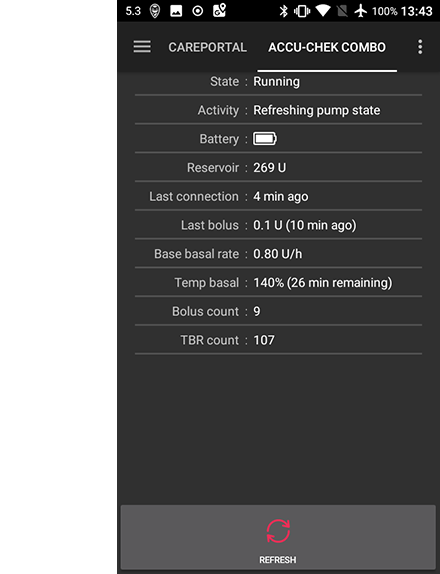
Here we see the status of the insulin pump - in this case an Accu-Chek Combo. The information displayed is self explanatory. A long press on the REFRESH button will read the data from your pump history, including your basal profile. But remember only one basal profile is supported on the Combo pump.
Care Portal
This replicates the functions you will find on your Nightscout screen under the “+” symbol which allows you to add notes to your records. Functions such as recording when you change a pump site, or insulin cartridge should be self explanatory. BUT this section does not issue any commands to your pump. So if you add a bolus using this screen it simply makes a note of this on your Nightscout record, the pump won’t be instructed to deliver a bolus.
Loop, OpenAPS AMA
You don’t normally need to worry about these, they show the results of the OpenAPS algorith which runs each time the system gets a fresh reading from the CGM. These are discussed elsewhere.
Profile
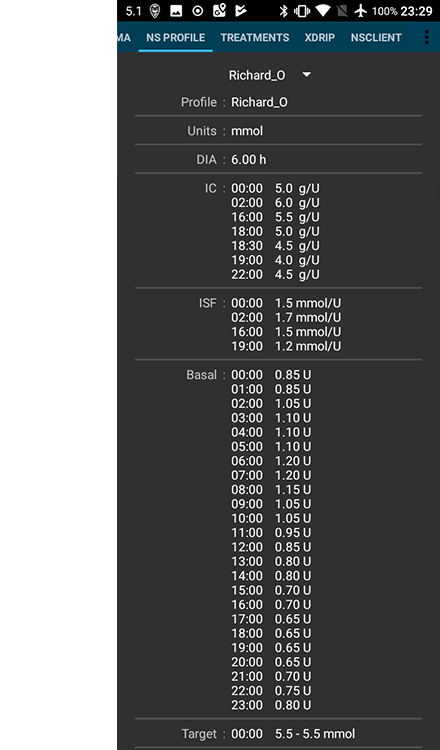
AndroidAPS can run using a number of different profile configurations. Typically - as shown here - the Nightscout profile has been downloaded via the built in Nighscout client and is displayed here in read-only form. If you wanted to make any changes you would do this from your Nightscout user interface and then do a “Switch Profile” on your AndroidAPS rig to refresh the download. Data such as the basal profile would then be automatically copied over to your pump.
DIA: stands for Duration of Insulin Action and it is discussed above in the section on insulin profiles.
IC: is Insulin to Carb ratio. This profile has a number of different values set for different times of day.
ISF: is Insulin Sensitivity Factor - the amount by which one unit of insulin will reduce your blood glucose assuming that nothing else changes.
Basal: is the basal profile programmed into your pump.
Target: is the blood glucose level that you want the rig to be aiming for all the time. You can set different levels for differenttimes of day if you wish, and you can even set an upper and lower range so that the rig will only start to make changes when the predicted blood glucose value falls outside, but if you do that then the rig will respond more slowly and you are unlikely to achieve such stable blood sugars.
Treatment, xDrip, NSClient
These are simply logs of treatments (boluses and carbs), xDrip messages and messages sent to Nightscout via the built-in Nightscout client. You don’t normally need to worry about any of these unless there is a problem.
Config Builder
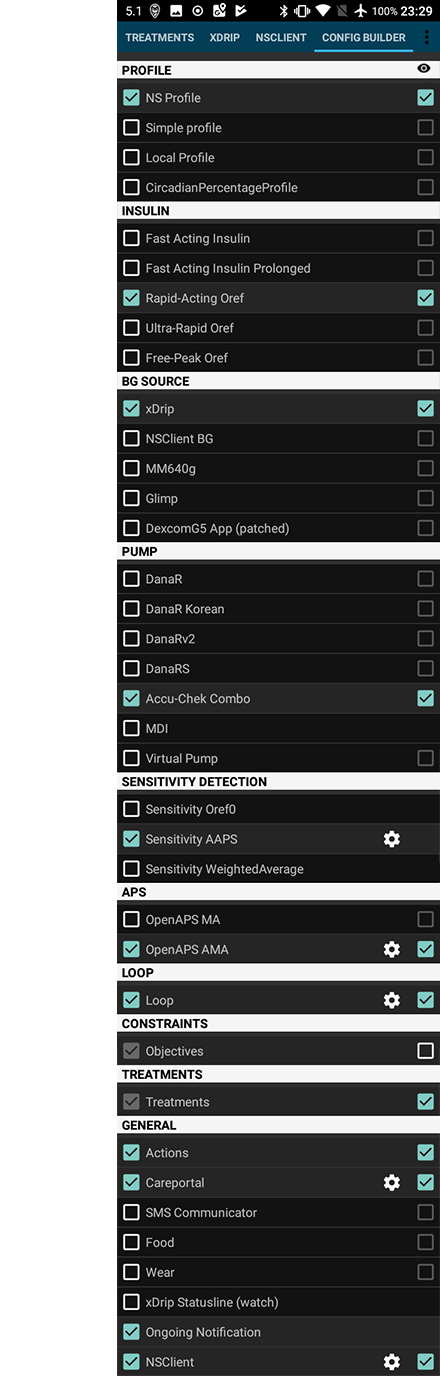
This is where you will set up the configuraton of your AndroidAPS rig. This screenshot shows a pretty typical rig using a Combo pump, a Dexcom G5 CGM sensor being managed via xDrip+ and running with NovoRapid insulin on an Oref profile and connected to a Nightscout cloud based server.
The tick box on the right determines if that particular module will be displayed in the top menu bar and the small gear wheel symbol allows access to the setting for that module, if there are any. If the module is not displayed in the top menu bar then you can still access it using the “hamburger” menu on the top left.
Settings and Preferences
At the top right of the navigation bar you will find three small vertical dots. Pressing on these takes you to the app’s preferences and settings, and emables you to export your settings if ever you need to transfer to a different rig. These are discussed elsewhere.